Building a Test Automation Framework using Cypress.io — Wrapping up! (Part 6)

Hallo!
In Part-5 of this article series we added Mochawesome Test Reporting to our Test Automation Framework. In this article we will add few remaining things such as multiple environment support, better run commands, add report logs (using addContext()), xpath support dependencies.
Alles klar, lass uns anfangen!

Adding multiple environments support
Often times, we need to run our test suites on different environments; say while merging PRs we can validate changes on a Staging or Dev environments, and once a release is decided, then we can validate the changes on a much stable environment such as QA or a prod-like environment.
In this scenario we would want to run tests, which we had run during the course of our development and it would make sense to write our tests in a creative way, such that it requires minimum changes to run our tests in different environments.

Things to consider, when running tests in multiple environments:
- URLs
- User roles and creds (test data)
- Software version or features availability
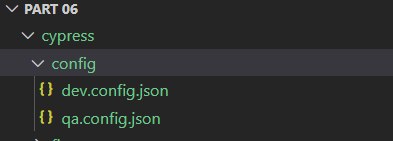
We are gonna be using Cypress Configuration to achieve this goal. Let's first create 2 different .JSON files under directory /cypress/config/, which will contain our environment specific data, we'll call our environments DEV and QA.
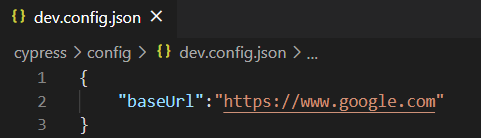
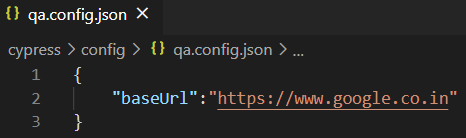
Let's add a property called baseUrl in both these .JSON files:
Before our framework could read these files, we have to make it understand where to find a config file, for that we need to following line of code in /cypress/plugins/index.js
const pathToConfigFile = path.resolve("cypress/config", `${env}.config.json`);
const fs = require('fs-extra');
const path = require('path');
const cucumber = require('cypress-cucumber-preprocessor').default;

module.exports = (on, config) => {
  on('file:preprocessor', cucumber());
  // `on` is used to hook into various events Cypress emits
  // `config` is the resolved Cypress config

  function getConfigurationByFile(env) {
      const pathToConfigFile = path.resolve("cypress/config", `${env}.config.json`);

      return fs.readJson(pathToConfigFile);
  }
  //if no environment is provided, then PR env will be default
  const env = config.env.configFile || "qa";

  return getConfigurationByFile(env);
};
Now in order to run our tests based on any of these environments, we would simple add configFile flag preceded with --env keyword
node runner.js cypress run --env configFile=devmore on different type of config file usage can be found HERE.
Also in cypress glue code we have to make 1 last change configFile flag preceeded with --env keyword
So far we are not leveraging the use of env config files anywhere, so in UI stepDefinitions.js; we're gonna replace the full blown url with '/' after this our code will pick up the baseUrl from the *.config.json file
Given('I open the Google web url', () => {
   cy.visit('/');  //replaced "https://www.google.com with '/'
});Now based on the configFile argument value baseUrl will be switched to either https://www.google.com or https://www.google.co.in.
Now, that we have support for multiple environments it makes sense to have our Test Runs organized based on these environments, to better visibility. So to achieve this we will make changes in our runner.js by adding a mechanism to identify which environment our Test run will be using based on configFile argument
...

// get environment from args..
const environment = getEnvironment(args);
...

/ identify an environment; default is "qa"
function getEnvironment(args){

 let environment;

  if(args.env){
    if(args.env === true){
	// if --env flag is passed from CLI but without following any arguments
        environment = "qa";
        return "qa";
    }

  const getEnv = args.env.split(",");

  getEnv.map((curr, index) => {

    const envProperty = curr.split("=");

    if(envProperty[0] === 'configFile'){
        environment = envProperty[1];
    }

// if --env flag is passed from CLI, but doesn't contain any 'configFile' argument
    if(index >= getEnv.length && environment === undefined){
      environment = "qa";
    }

 })

 return environment;

} else{
// if no --env flag is passed from CLI
    environment = "qa";
    return "qa";
 }
}and then replace all the existing filePaths in runner.js, which looks like :
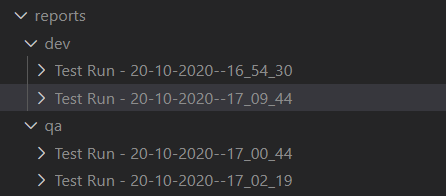
"reports/Test Run -" with "reports/" + environment + "/" + "Test Run -"
That is all we need to do. After this change our /reports directory will look like below:
Wunderbar!!
Crafting Better Run commands a.k.a Run Scripts
So far our full-blown run command looks like below:
node runner.js cypress run --env configFile=dev TAGS="@UI"which is lots of keywords, if you ask anyone. We are gonna optimize these commands using package.json scripts.
we can write a run script for an environment DEV as cy:test:dev for complete line:
node runner.js cypress run --env configFile=dev
"scripts": {
    ...
    "cy:test:dev": "node runner.js cypress run --env configFile=dev",
    "cy:test:qa": "node runner.js cypress run --env configFile=qa"
},Now to run these scripts we execute below command
npm run cy:test:devor, if we have to provide any additional --env arguments, we can add them like below, right? But no, the following won’t work:
npm run cy:test:dev TAGS="@UI"There is only one issue with this approach, i.e. we have to provide all the --env arguments at single place separated by comma like below:
node runner.js cypress run --env configFile=dev,TAGS="@UI"Adding report logs:
In our Mochawesome reports, the reports which we have seen so far, contain information about if a test scenario is passed or fail or the reason of failure.
Now, what we would like our reports to have more logging info, such as:
- Flexibility to add log info as and when we require it in our test execution
- Status of each Scenario test step and the duration it took to execute that step
To achieve are report logging goals, we are gonna make use of addContext(); provided by Mochawesome.
Flexibility to add log info as and when we require it in our test execution:
We are gonna write few Cypress Custom Commands instead of using it directly in our code. So we are gonna create our commands in cypress/support/commands.js
const addContext = require('mochawesome/addContext');Once it addContext() is imported from Mochawesome, then create a command
//Following command logs only subject in Report file
Cypress.Commands.add("reportLog", (context) => {
  cy.once("test:after:run", (test) => addContext({ test }, context))
});

//Following command logs only Context,Value as KEY-VALUE in Report file
Cypress.Commands.add("reportLogKV", (context, value) => {
  cy.once("test:after:run", (test) => addContext({ test }, {
    title: context,
    value: value
  }))
});
Now using 2 commands which we added in cypress/support/command.js
    cy.reportLog("This is Subject");

cy.reportLogKV("This is key!","This is value!");These will be shown at the end of a test run in Run Report as following:

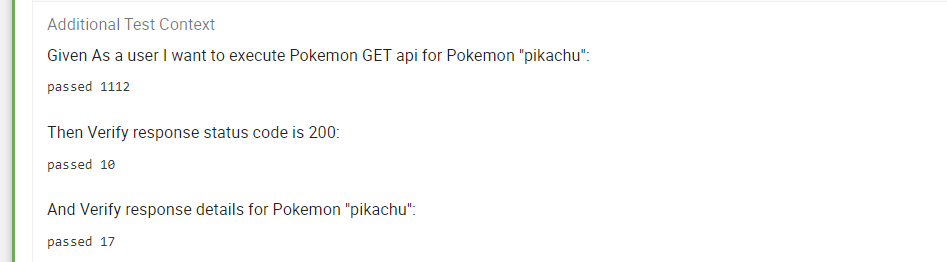
Status of each Scenario test step and the duration it took to execute that step:
As our test cases are BDD test cases, so it would be nice to see execution details of each and every test step in Run Report:
To get detail of every step execution we have to make use of Cypress state window.testState
We will be adding this code to support Step Status in Cypress test:after:run event within file cypress/support/index.js
...
const addContext = require('mochawesome/addContext');
...

//Runs after a test completes
Cypress.on('test:after:run', (test, runnable) => {

  ...
  let scenarioName = window.testState.currentScenario.name;
  let stepResult = window.testState.stepResults;

  window.testState.scenarioSteps[scenarioName].forEach(function(currStep,index)   {
    addContext({ test }, {
      title: currStep.keyword + " " +  currStep.text,
      value: stepResult[index].status + " " + stepResult[index].duration
    })
  });
...
Once this code is added to cypress/support/index.js it will be run after each test and will append BDD steps execution details under a test like below:
Although, Mochawesome right now restricts how reportLogs are shown in our reports, we hope that in Future Mochawesome will allow us to integrate HTML code in addContext() so that we could see this info in a better visual format
Adding XPATH Support:
In order to have x-path support in our framework, we'll rely on Cypress-Xpath
npm install cypress-xpath --save-dev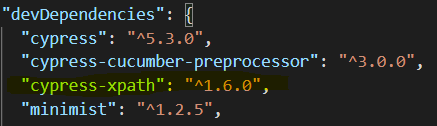
Include cypress-xpath in cypress/support/index.js
require('cypress-xpath')In order to use XPATH in our framework, we'll add new XPATH locator in pages/HomePage/element.js
SEARCH_TXTBOX_XPATH: "//input[contains(@name,'q')]"Now in our pages/HomePage/HomePage.js we'll replace SEARCH_TXTBOX with SEARCH_TXTBOX_XPATH in typeInSearchTxtBox() function as below
...
  typeInSearchTxtBox(value) {
    return cy.xpath(elements.HOMEPAGE.SEARCH_TXTBOX_XPATH).type(value);
}Das ist alles.
In this article series, we built a Test Automation Framework around Cypress.io. It was fun and learning experience building things as part of this article series. I will keep adding new things to this framework and will continue cataloguing things in this space. Prost!
Auf Wiedersehen!
GitHub repo: https://github.com/far11ven/Cypress-TestFramework/tree/develop/Part 06

![Sanitizing ArrayBuffer response [shorts]](https://digitalpress.fra1.cdn.digitaloceanspaces.com/omtmgjm/2024/07/Screenshot-2024-07-02-145822-3.png)
![Cypress GitHub Teams Notification [shorts]](https://digitalpress.fra1.cdn.digitaloceanspaces.com/omtmgjm/2023/09/44036562.png)
![ChatGPT x Cypress.io API tests [shorts]](https://digitalpress.fra1.cdn.digitaloceanspaces.com/omtmgjm/2023/02/cypress-chatgpt.png)